Wednesday, January 30, 2013
Forest Scene
This is a forest scene that I made. It includes a fawn, a squirrel, and a lynx. Some things that you can do (if you are also making a forest scene) that I did not do are, I could have added more trees, more limbs on the tree, a couple smaller animals such as mice, rabbit, ect. Perhaps I will make a tutorial for different scenes some other time (once I have more tutorials for single animals).
Tuesday, January 22, 2013
How To Draw A King Cobra
Next, you will darken the head oval.
Then, you darken the head pieces.
Now, draw lines tracing the small neck ovals to the back of the large oval.
Then darken the other side of the large oval.
Next, you will make a line going from the bottom half of the large oval, and curving to the top half.
Then make another one that starts from the top half going to the lower half.
Do the same again.
And again.
Now that you have your basic outline, erase the fade ovals.
Now add eyes.
Then in the middle of each eye, draw a small circle.
Now add a tongue.
Now color in the small circles in the eyes.
Now add marks (optional).
Color it in (you can make it any color that you like).
Then complete the snake and sign.
Sunday, January 20, 2013
How To Draw A Kitten
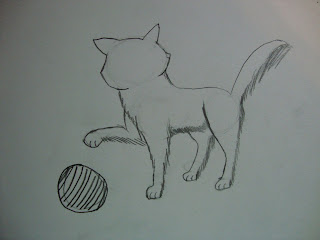
First you will draw eight circles. One for the head, two for the body, four for the legs, and one for the ball (ball is optional).
Then you will make a line for the tail (for now) and add fur to the face and a neck.
Then to get the legs, you make a furry line starting from the neck going down to the paw. Then make a furrier line on the other side of the leg. Then do the same with the other leg.
Next you will add two curved lines for the ears.
Then erase the circles on the paws.
Next, draw a fuzzy looking line to the back thigh. To make the thigh you will make a short curved line using your circle. Then make another line on the other side of the circle.
Then add extra lines to the curves on the head to make ears.
Then erase your circles that are NOT the back feet or the ball.
Next, you will makes the back of the tail.
Now go from the thigh down to make your feet.
Then add lines on the paws.
Next outline your ball with a darker shade of black and makes lines.
Now makes more lines.
Then make your oval eyes and nose (with mouth).
Then add markings (you can make them any way). And color in the eyes (but leave a white dot, for light reflection).
You can make it any color, but for this drawing I will be using light brown, dark brown, yellow, orange, and black.
Use the black to make more marks and outline your white marks with darker black.
Then outline the black with a thicker layer of dark brown.
Then color the cat orange.
Next add a yellow layer over the orange.
Then add your light brown.
Then you will need red (pink would be easier) and another color (for the ball).
Then use the red (If you box of colored pencils does not have pink) to lightly color in the nose. And color is your ball of yarn then sign your picture.
Tuesday, January 15, 2013
Horses
Some of the most important things when drawing a horse are, #1 Get the head circles right. If the head circles are not proportioned right the horse will look bulky or strange. #2 Try to keep the legs more pointed then curved. This will make the horse look more fake (As you can see in the left back leg on the grey horse). #3 No circle eyes. Making plain white circular eyes on a horse just doesn't look right. As you can see the horses in the pictures have more of pointed oval eyes. Remember that there are no real rules to drawing these are just tips.
Sunday, January 6, 2013
How To Make A Fox
 |
| First get your piece of paper (of any color) and place it in front of you. |
 |
| Then fold the paper in half and cut out a trapezoid on the open end. (do NOT throw away the trapezoids) |
 |
| Next open the paper and flip it to look like this. Then fold the top part down. |
 |
| Then do the same to the bottom half. |
 |
| Then fold each of the corners into little triangles (be sure to crease well). |
 |
| Then starting from the triangles cut diagonally to make more triangles (do NOT cut them out). |
 |
| Then fold in the triangles (tape them if they do not stay down). |
 |
| Then fold the tips of the (legs). |
 |
| Then place in front of you, one of the trapezoids that you cut out earlier. |
 |
| Then cut out a triangle shape in the middle (do NOT cut all the way). |
 |
| Then fold down the triangle. |
 |
| Then cut off the edges. |
 |
| Next you will staple (or tape) the back of the head to keep it together. |
 |
| Here is what the head will look like on the rest of the fox (do NOT attach the head yet if you want to further decorate the fox). |
 |
| Next place your last remaining trapezoid in front of you. |
 |
| Then cut a tail out of the trapezoid. |
 |
| Next you will color in the tail. |
 |
| Then tape the tail to the back of the fox. |
 |
| Now back to the head. Color in the nose and snout. |
 |
| Then fold the snout against the head and then fold it again against the head. |
 |
| Then add detail to the face by adding eyes and color. |
 |
| Then tape or glue the head to the body and you have your fox. |
 |
| Fox from different angle. |
Subscribe to:
Comments (Atom)


