 When you look at this picture, what stands out the most? To most people, it is probably the vines. It could be that, they are the biggest or have more components. But another thing that makes it stand out, are the dark and thick lines. The bush also has dark lines, but they are not very thick. The grass, which doesn't stand out very much at all, has neither dark or thick lines.
Tuesday, October 29, 2013
Thicker and Darker Lines
 When you look at this picture, what stands out the most? To most people, it is probably the vines. It could be that, they are the biggest or have more components. But another thing that makes it stand out, are the dark and thick lines. The bush also has dark lines, but they are not very thick. The grass, which doesn't stand out very much at all, has neither dark or thick lines.
Tuesday, October 22, 2013
Scribble Drawings
You might have made scribble drawings before. But if you haven't it is a good way to use up spare time. You start out, by simply making scribbles all over your paper.
Then you look through your scribbles for an outline (mine is a rabbit).
Then you erase the scribbles inside the outline (you don't have to if you don't want to).
Then you add basic features, like eyes, a nose, and a tail (if you are making an animal).
Then you can add other features, such as legs.
Then you can add markings (optional).
Then color in your outline (if you leave the scribbles inside the outline, you can color it in like how I will do the background).
You start off by coloring in a few of the open areas.
Then some more with a different color or different shade of the same color.
Then you keep on filling in the holes.
Until you are done.
Tuesday, October 15, 2013
Clay Hedgehog Pencil Holder
I made this a few months ago (2-3). As you can plainly see, it has lots of cracks in it. That is because it blew up in the kiln and I glued it back together. To make a hedgehog pencil holder, you start out with an oval of clay for the body (you could use polymer clay if you had enough of it). Then you make four feet (attach very well so they don't fall off). Then you make the head out of a stretched oval. After that, you make the eyes, nose, and ears. After you attach everything securely you make the pencil holes and it you are not using polymer clay, you dig out the center (so that it doesn't blow up). I will add a better tutorial if I make one out of polymer clay.
Tuesday, October 8, 2013
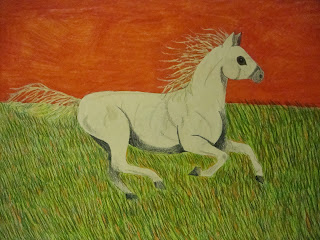
Running Horse Drawing
For this post, I will explain how I did some of the picture. Since I have already done a horse head tutorial, you should know how to make it. For the rest of the horse, I will try to get a tutorial sooner or later. For the sky, I used chalk pastels (I probably could have used something else, but I was seeing how they worked). To make the sunset, you have to add different layers of color. For example, red, orange, yellow, pink. Or if you wanted a more orange sunset, you could have just done different shades of orange. For the grass, I picked out multiple shades or green and some oranges. After making little lines of each color (yes this will take a while), I colored the entire grass area with lime green (to get rid of white spots).
Subscribe to:
Comments (Atom)


.JPG)
.JPG)
